Passing with Overlapping in a Diamond
-
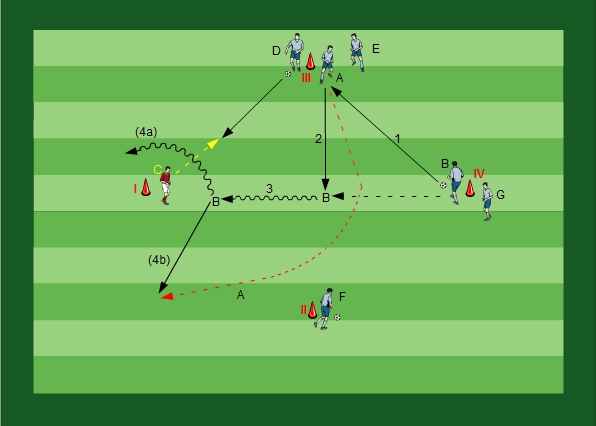
Organisation
A cross or diamond is formed using 4 cones. One players starts at cones I + II, three players start at cone III and two players start at cone II.
There is a ball at cones II + III. (4a) Various 1 Dribbling (4b) Various 2 Passing
-
Process
Player B plays a one-two with player A, controls the ball and the dribbles towards C. Player A overlaps and gives the option of the pass.
Player B now has the option of taking on player C or to pass to player A into space for A to run onto.
C then moves to give the option of another one-two with D and now they try to taek on player F. After the lay off to palyer D, C overlaps D.
The drill is first played to cone I, then cone II and then cones IV and/or III.
-
Tip
- 4 cones.
- This passing drill is very intensive and tiring and requires a large amount of game intelligence.
- Switching the play to the other side, missing out the midfield
- A good touch and passing technique is essential.
- The standing leg is sometimes too far away from the ball and some players lean back too much.
- Demand good strength of pass and pass precision.
- Pass precision is more important than pass speed.
- Concentration must be held at all times.
- Anticipation, awareness, reaction, speed of thought and movement with and without the ball are continuously required.
- The aims of this drill are switching from offense to defense, crossing the middle zone quickly and the setting up of new passing situations.
-
Field size
20 x 20m
-
Cone margins
Distance from the middle of the diamond: 10m

Training Set
Duration
Age
Technique
Tactics
Co-Ordination
Condition
Training Organization
Number of Players
Form of Training
Exercise level
Spatial Behavior
Training Location
Author: Christian Titz
More exercises
|